
How to Digitize Your Records, Part 1: From Vinyl to Raw WAVs
Having switched from vinyl to digital DJing, I recently found myself needing to digitize a few records from my collection. Digitizing vinyl isn’t hard but there are a few important points to keep in mind. In this two-part post, I’ll describe what equipment you’ll need for digitizing vinyl, how to prepare for a recording session and how to go from raw WAV recordings to digital tracks that you can DJ with. (Click here for part 2.)
The Equipment
Here is what you will need to transfer a vinyl record to a digital format:
- A turntable
- A phono preamp (normally built into your mixer or a dedicated USB audio interface)
- A computer
- Connecting cables as needed
- Audio recording software.
Connecting your turntable to a computer or laptop is actually a micro-challenge. The thing is, turntables normally have a “phono” audio output, which has a much lower signal level than the “line” input expected by a computer. That’s not to mention that a turntable typically has two “male” RCA connectors with a grounding cable, and there’s just nowhere to plug them into on a computer or laptop.
The solution is a phono preamp. The preamp’s job is to take the audio signal from the turntable and amplify it to the “line” level that your computer will be happy with. Luckily, most mixers have a phono preamp built in. You can connect your turntable to the mixer, and then connect the mixer’s Master or Rec output to the computer’s Line In input.
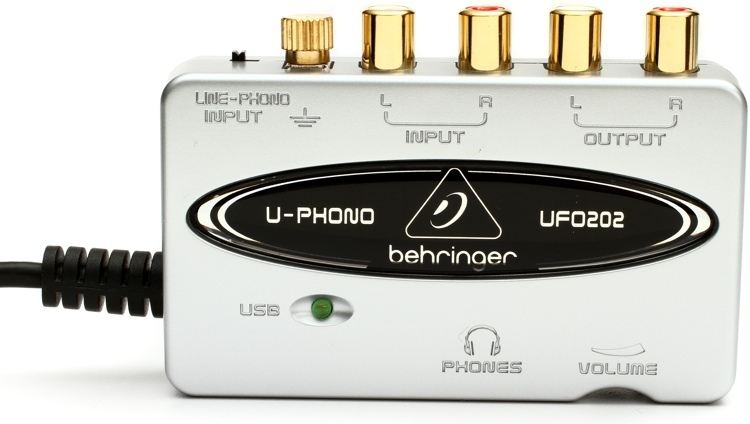
The Behringer U-Phono UFO202 USB audio interface lets you digitize your vinyl with ease.
What if your computer or laptop doesn’t have a Line In input? You can get an external USB audio interface with one. Or, you could get a USB interface specifically intended for digitizing vinyl, like the Behringer U-Phono UFO202. It has the RCA inputs and the grounding knob alongside a built-in phono preamp, meaning that you won’t even need a mixer to record. It also has a headphone output so you can monitor what you are recording. I use the UFO202 and I couldn’t be happier.
The software side of things is easy. Just get Audacity or use any other decent audio editor that you’re comfortable with.
Deciding Which Tracks to Digitize
Digitizing vinyl requires an investment of time and effort on your part. Remember this as you’re deciding which the tracks to transfer to digital. You probably don’t need to digitize each and every one of your records, or each and every track on them. Come up with a list of tracks that you’d like to DJ with digitally in the foreseeable future, and go with that.
As you consider adding a record to your list, run a quick check on iTunes Store, Google Play or Beatport to see if the record has already been released digitally. If it has, then going through the hassle of digitizing it may just not be worth the $1 or so per track that you’ll save in the process (I know it isn’t to me). Besides, you’ll get better sound quality with a native digital track that didn’t have to suffer a vinyl to digital conversion.
The Recording Session
Now that your equipment is ready and you have set aside the records you’ll be recording, it’s time for the fun part. But before you can actually get down to recording, there are two things that you need to check. First, make sure that the turntable’s pitch control is at 0%. Second, see if your stylus is clean. If you haven’t cleaned it in a while, now is a good time to do so with a special brush and cleaning liquid.
Digitizing a record can be broken down into 8 simple steps.
- Prepare the recording in your software. I record in the CD-quality “44.1 kHz, 16-bit stereo” format. I could perhaps do a better bit resolution but that’s the highest my UFO202 can go.
- Clean the record. Use a cleaning brush and liquid to gently remove any dust and grease from the record’s surface. You’ll be playing back this recording many times, so you might as well make sure that you record the best possible sound!
- Adjust the levels. Put the needle somewhere in the middle of the track you want to record. Adjust the recording level in your software so that the level meter jumps near 0 dB but never crosses that mark. (Note: The UFO202 doesn’t let you adjust the input level. If a record is clipping, I record it through my analog mixer, where I can lower the level via the channel Gain.)
- Start the recording. When you are ready, click that Record button in your audio software.
- Put the needle on the record. Gently put the needle at the beginning of the track you are recording.
- Keep it quiet. As the track is being recorded, avoid jumping/dancing, making loud sounds or tapping on the table where the turntable is sitting. All of those may impact the recording.
- Lift the needle. After the track has ended, lift the needle from the record. I like to give the track some extra time after it’s over, in particular to make sure that a long fade in the end gets captured fully.
- Stop the recording. Stop the recording in the software.
- Save as WAV. Click “Save As…” in your software and save the recording in an uncompressed WAV format. For example, I go with “WAV (Microsoft) signed 16-bit PCM” for my 16-bit recordings.
At the end of your recording session, you will have a bunch of WAVs with raw track recordings sitting on your hard drive. In part 2 of this series, I will tell you how to turn those into finished digital tracks that you can DJ with. Till then!
Did you have to digitize your records? What software and hardware did you end up using? Scroll down to the comments below and let me know!


About the Author JM
JM has played open-air gigs, shared the stage with the likes of ATB and had mix albums released commercially. He has been teaching DJing since 2008.
Session expired
Please log in again. The login page will open in a new tab. After logging in you can close it and return to this page.