How to Record a Mix, Part 2: Post-Production
After you’re done recording your mix (see part 1 of this mini-series), you’ll end up with either a WAV file containing the whole thing, or a number of tracks and transitions between those in separate files. Today, we’ll be doing some basic mastering of your recording in order to prepare it for burning onto CDs and uploading to the Internet.
Gluing the Chunks Together
If you recorded your mix in chunks or used the “semi-live” approach where you redid bad blends as you were recording, then the first step of the post-production is to glue all those tracks and transitions into a continuous mix. (You can skip this part if you recorded your mix live from start to finish.)
In the outline below, I assume that you have your tracks and transitions in separate files. It’s not essential, though, because for the “semi-live” recording method, the process is pretty much the same.
First, create a new file in your sound editor with the same attributes as your recording (44,100 Hz, 16-bit, stereo) and save it as “Mix.wav”. This is the file where we’ll be building out the mix. Copy the first song of the mix from Track 01.wav and paste it into Mix.wav. Now you need to append the transition from track #1 to track #2, which you have saved in Transition 01-02.wav, to the end of that first track.

Finding the merging point in Sound Forge
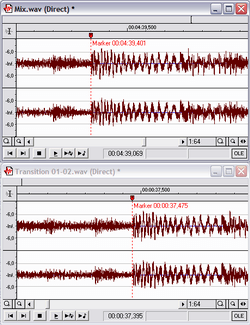
To do that, find the exact same spot on the first track in Mix.wav and Transition 01-02.wav. A spot that’s easy to locate is the first beat of a track’s 8-bar phrase that comes before the transition. After you’ve found it, put a marker on that spot both in Mix.wav and in Transition 01-02.wav (to put in a marker in Sound Forge, press the M key on the keyboard). Start zooming in on the files and dragging the markers to the same spot in both windows until you hit the maximum zoom. Your goal is to mark the spot in both files with maximum precision (see screenshot).
Now that you have your insertion point, delete all sound after it in Mix.wav. In Transition 01-02.wav, copy the transition from the marker onwards and paste it to the end of Mix.wav. Check out how the track sounds on the marker: if you’ve done everything right, the stitching should be completely unnoticeable.
Continue in the same fashion by appending track #2 to the transition, then the transition from #2 to #3, and so on. What you’ll end up with is one big WAV file that holds the whole mix. After you’ve made sure that all insertion points are unnoticeable to a listener, you may delete the no longer needed markers.
Evening Out the Volume of the Tracks
Strange heading, isn’t it? After all, you’ve set the sound level before recording, and were maintaining a constant level throughout the mix. True, but the thing is, sometimes the perceived volume of a track in your mix will still come out noticeably lower (or higher) than that of the rest of the songs. The reason is simple: Even though the track’s level is peaking at around 0 dB, its average sound level is lower.
So what do you do about it? You can’t simply increase the level of the track: it’s already peaking at around 0 dB, so clipping is inevitable. Compression to the rescue!
A compressor is a special device or software function that amplifies quiet passages of a song but leaves the loud ones unaffected. As a result, the average sound level (and so the perceived volume) of the track gets increased, but the peak levels remain the same. Of course, the difference in volume between the loudest and softest parts of the song is thereby diminished, hence the full name of the device: dynamic range compressor.

The Normalize window in SF
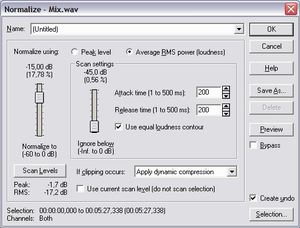
Now that you know what compression is, you can use it to fix that problem track in your mix. First, get an idea of how quiet it is in relation to its neighbors. If you use Sound Forge, select the main part of the song in the editor and click Process ➝ Normalize. In the Normalize window (see screenshot), click Scan Levels. Take note of the RMS value (i.e. the average sound level) for the sample. Next, click Cancel and find out the RMS for the neighboring tracks. Suppose that their RMS is around -15 dB, and the track at hand is quieter with an RMS of around -18 dB. You need to apply some compression to the tune so as to increase its RMS.
Select the main part of the track between the transitions. Make sure that the selection starts and ends with complete 8-bar phrases. (All major changes in the music should take place at new phrases – remember?) Open the Normalize window once again and choose “Average RMS power (loudness)” for the “Normalize using:” option. Set the level slider to the left to -15 dB. In the “If clipping occurs:” dropdown box, choose “Apply dynamic compression” like on the screenshot. This will make the editor apply compression instead of letting peak levels go beyond 0 dB causing clipping. Click OK.
Now listen to the mix starting from the transition to the problem track. You’ll hear how the sound becomes much louder at the new phrase. No wonder; we’ve amplified the main part of the song but it still plays at the old level during the transition. Thus you also need to amplify the blend, although to a smaller extent than the whole track. Finally, you’ll need to do the same to the transition from the problem track to the next one.
I know all this sounds a bit complicated, but fixing the volume of a problem track actually isn’t that hard, especially if your editor has the “Undo” button! Just trust your guts, let your musical intuition guide you and you’ll be fine.
Compressing the Whole Mix
Compression is routinely used in most commercial albums to make the music sound louder. If you don’t want your mix to sound too quiet compared to the other CDs out there, you may want to increase its average sound level, too. To do this, use the Normalize function to increase the entire file’s RMS to, say, -12 dB. Don’t overdo it: excessive compression may cause distortion and is tiring to a listener.
Splitting Your Mix into CD Tracks
At this point, your WAV file should contain the final master of the mix. If you’re only planning to upload it to the Internet, there is no more post-production to be done. If you’d like to burn a promo CD, however, you’ll need to split the mix into separate tracks so the CD is easier to navigate.
Here is a simple rule of thumb that I use when splitting a mix into tracks. A new track on the CD should start at the first beat of a phrase where a new tune in the mix begins to clearly dominate over the old one. Sometimes I simply close my eyes, listen to the blend and try to imagine at what point starting a new CD track would be the most appropriate.

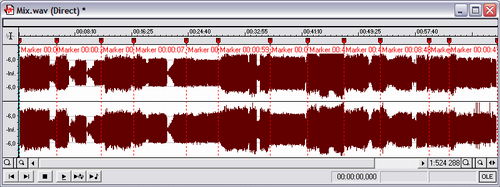
A mix ready to be split into tracks (compression not yet applied)
One of the easiest ways to split a mix in Sound Forge is by using markers. After you’ve put a marker on the beginning of each CD track as well as on the very end of the mix (that’s important!), go to Special ➝ Regions List and click Markers to Regions. The markers will turn into regions that will correspond to your CD tracks. Next, click Tools ➝ Extract Regions to export all those regions into separate WAV files ready to be burned onto a CD.
That’s it as far as mix post-production goes. In the third and final part of this article, I’ll show you how to burn a promo CD as well as how to turn your mix into an MP3 that you can upload to the Internet. Until then, post comments or ask any questions that you may have!
About the Author JM
JM has played open-air gigs, shared the stage with the likes of ATB and had mix albums released commercially. He has been teaching DJing since 2008.
Session expired
Please log in again. The login page will open in a new tab. After logging in you can close it and return to this page.

